Using Custom Commands
The Custom Commands interface provides a set of commands for customizing menus, creating custom commands, and managing their states in M-Files UI Extensions. The ICommands provides set of tools for developers to customize the user interface, manage commands, and control their visibility and availability within the application.
Managing Commands
ICommands is part of IShellFrame interface. To use this interface you have to first obtain instance of the IShellFrame.
Creating a Custom Command
The commands created by the ICommands interface are usually so called Custom Commands which are available only for your UI Extension application.
// Create a new custom command using IShellFrame instance.
const commandId = await shellFrame.Commands.CreateCustomCommand(name);
Controlling the Command visibility
Creating a command does not automatically add the command to the user interface. To do that the SetCommandState method must be used. This method defines the command state (hidden/visible) in specific parts of the user interface:
shellFrame.Commands.SetCommandState(
    commandId, // The ID of the command which state is to be changed
    MFiles.CommandLocation.MainMenu, // The location in the UI where the command's state is being changed
    MFiles.CommandState.CommandState_Hidden  // New state of the command in specific location
);
Executing the Command manually
The Custom command can executed directly using ExecuteCommand, which accepts also optional data parameter.
The data must be serializeable using Structured Cloning Algorithm.
// Execute a new custom command with data parameter
await shellFrame.Commands.ExecuteCommand(commandId, {
    someCustomData: 1234
});
Listening and Responding to Custom Commands
User can listen to cuostom command events using MFiles.Event.CustomCommand, which has a callback having parameters (commandId, data).
It is generally recommended to have a single listener function for custom commands to avoid responding to the same command multiple times.
// Listen for the custom commands.
shellFrame.Commands.Events.Register(

    // Listen for the CustomCommand events.
    MFiles.Event.CustomCommand,

    // Each command has ID and optional data provided with it.
    ( commandId, data ) => {
    }
);
Command locations
The commands sample includes practical examples of code that adds commands to different locations.
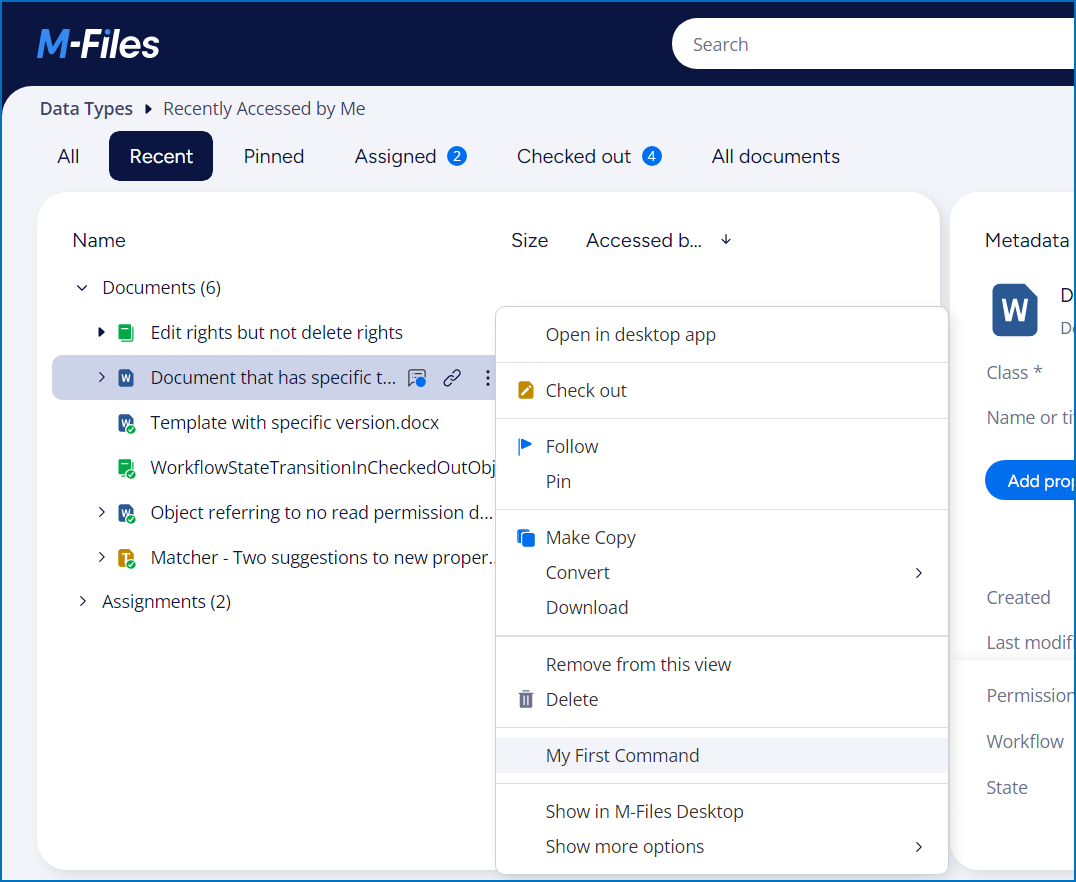
Commands can be shown in two primary locations: within the context menu (shown when the user right-clicks on something in a listing), and within the main menu.
The context menu
Commands can be added to the context menu which is shown when a user right-clicks on something in a listing. The command may be shown similarly to this:

// This code should be placed to run when the shell frame is started.

// Create the command.
const commandOneId = await shellFrame.Commands.CreateCustomCommand
(
    "My First Command"
);

// Add the command to the bottom of the context menu.
await shellFrame.Commands.AddCustomCommandToMenu
(
    commandOneId,
    MFiles.MenuLocation.MenuLocation_ContextMenu_Bottom, // Note: context menu
    1
);

// Show a message when the command is clicked.
shellFrame.Commands.Events.Register(
    MFiles.Event.CustomCommand,
    async ( commandId ) => {

        // If something other than our command was clicked then die.
        if(commandId !== commandOneId)
            return;

        // Our context menu command was clicked.
        await shellFrame.ShowMessage( "My context menu command was clicked." );
    }
);
The main menu
The commands sample includes practical examples of code that adds commands to different locations.
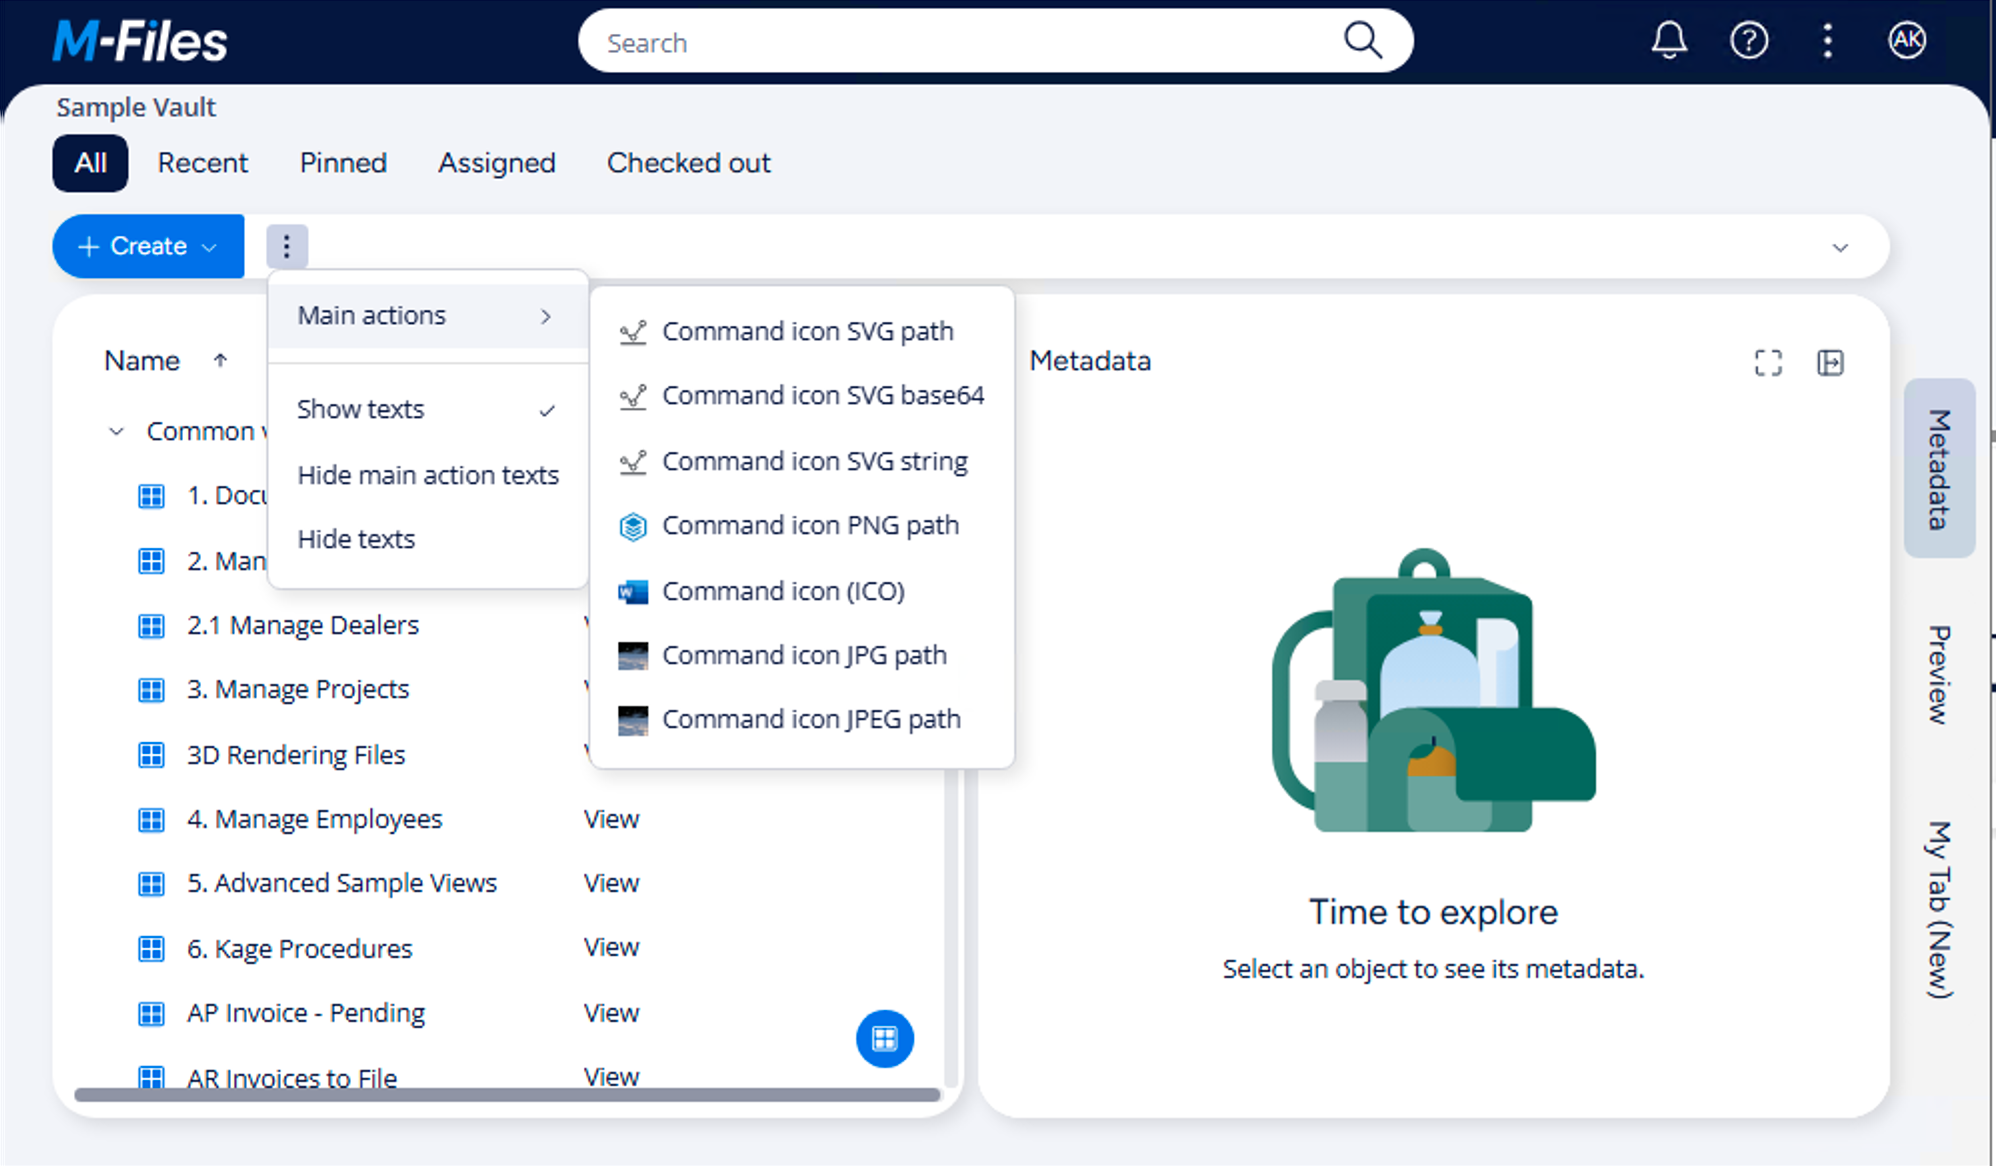
Commands can be added to the "main menu", which is located at the top-right of the user interface, as a three-dot icon. Clicking this icon expands the menu and shows commands added to the menu.
The main menu is not shown until one or more UI Extensions add commands to this location.
// This code should be placed to run when the shell frame is started.

// Create the command.
const commandOneId = await shellFrame.Commands.CreateCustomCommand
(
    "My First Command"
);

// Add the command to the main menu.
await shellFrame.Commands.AddCustomCommandToMenu
(
    commandOneId,
    MFiles.MenuLocation.MenuLocation_TopPaneMenu, // Note: top pane menu
    1
);

// Show a message when the command is clicked.
shellFrame.Commands.Events.Register(
    MFiles.Event.CustomCommand,
    async ( commandId ) => {

        // If something other than our command was clicked then die.
        if(commandId !== commandOneId)
            return;

        // Our context menu command was clicked.
        await shellFrame.ShowMessage( "My top menu command was clicked." );
    }
);
Child commands
The main menu supports commands with sub-menu commands. This functionality allows you to group commands logically by function within your application:

To do this, create the parent command and then call CreateSubMenuItem to create child commands:
// This code should be placed to run when the shell frame is started.

// Create the parent command.
const commandOneId = await shellFrame.Commands.CreateCustomCommand
(
    "My First Command"
);

// Add the parent command to the main menu.
const parentMenuItemId  = await shellFrame.Commands.AddCustomCommandToMenu
(
    commandOneId,
    MFiles.MenuLocation.MenuLocation_TopPaneMenu, // Note: top pane menu
    1
);

 // Create child commands (buttons).
const commandChildOneId = await shellFrame.Commands.CreateCustomCommand
(
    "My First Child Command"
);
const commandChildTwoId = await shellFrame.Commands.CreateCustomCommand
(
    "My Second Child Command"
);

// Add the child commands to the parent.
await shellFrame.Commands.CreateSubMenuItem( parentMenuItemId, commandChildOneId, 1 );
await shellFrame.Commands.CreateSubMenuItem( parentMenuItemId, commandChildTwoId, 1 );


// Show a message when the command is clicked.
shellFrame.Commands.Events.Register(
    MFiles.Event.CustomCommand,
    async ( commandId ) => {

        // Only react when the child commands are clicked.
        if(commandId !== commandChildOneId && commandId !== commandChildTwoId)
            return;

        // One of the two child commands was clicked.
        await shellFrame.ShowMessage( "One of the child commands was clicked!" );
    }
);
Context menus do not currently support child commands.
Icons
Commands support icons in all menu locations.
Adding an icon for command can be done using SetIcon method with IIconInformation configuration.
Example of setting an icon from a relative path for a custom command.
First, create a custom command ID. Next, add the necessary information to the icon information object to set the actual icon. Finally, add the command to any menu location. All current menu locations are supported, and the added icon will appear on the left side of the menu item.
// This code should be placed to run when the shell frame is started.

// Create custom command ID.
const customCommand = await shellFrame.Commands.CreateCustomCommand("Custom command");

// Create icon information.
const iconIdInformation = {
    content: "assets/icons/customCommandIcon.svg",
    iconContentType: "PATH",
    alt: "Custom command icon alt",
    extension: "svg"
};

// Set icon for created command ID.
await shellFrame.Commands.SetIcon(commandCheckoutId, iconIdInformation);

// Add command to the taskbar menu location.
await shellFrame.Commands.AddCustomCommandToMenu(commandCheckoutId, MFiles.MenuLocation.MenuLocation_TaskBar_MainActions, 1);
IIconInformation configuration examples for other content types.
SVG string icon:
// Icon in SVG string format.
const svgStringIcon = "<svg width='16' height='16' viewBox='0 0 16 16' fill='none' xmlns='http://www.w3.org/2000/svg'><rect x='1' y='14' width='14' height='1' rx='0.5' fill='#363A40'/><circle cx='3' cy='7' r='1.5' stroke='#363A40'/><path d='M5 8L6.5 10.5' stroke='#363A40'/><circle cx='8' cy='11' r='1.5' stroke='#363A40'/><circle cx='13' cy='3' r='1.5' stroke='#363A40'/><path d='M12.5 4L9 9.5' stroke='#363A40'/></svg>";

// Create iconInformation object.
const iconIdInformation = {
    content: svgStringIcon,
    iconContentType: "SVG",
    alt: "Custom command SVG string icon alt",
    extension: "svg"
};
Base64 string:
// Icon in base64 string format.
const base64StringIcon = "PHN2ZyB3aWR0aD0iMTYiIGhlaWdodD0iMTYiIHZpZXdCb3g9IjAgMCAxNiAxNiIgZmlsbD0ibm9uZSIgeG1sbnM9Imh0dHA6Ly93d3cudzMub3JnLzIwMDAvc3ZnIj4KPHJlY3QgeD0iMSIgeT0iMTQiIHdpZHRoPSIxNCIgaGVpZ2h0PSIxIiByeD0iMC41IiBmaWxsPSIjMzYzQTQwIi8+CjxjaXJjbGUgY3g9IjMiIGN5PSI3IiByPSIxLjUiIHN0cm9rZT0iIzM2M0E0MCIvPgo8cGF0aCBkPSJNNSA4TDYuNSAxMC41IiBzdHJva2U9IiMzNjNBNDAiLz4KPGNpcmNsZSBjeD0iOCIgY3k9IjExIiByPSIxLjUiIHN0cm9rZT0iIzM2M0E0MCIvPgo8Y2lyY2xlIGN4PSIxMyIgY3k9IjMiIHI9IjEuNSIgc3Ryb2tlPSIjMzYzQTQwIi8+CjxwYXRoIGQ9Ik0xMi41IDRMOSA5LjUiIHN0cm9rZT0iIzM2M0E0MCIvPgo8L3N2Zz4K";

// Create iconInformation object.
const iconIdInformation = {
    content: base64StringIcon,
    iconContentType: "BASE64",
    alt: "Custom command SVG base64 string icon alt",
    extension: "svg"
};
Note: With Base64 string, extension information must be provided in order to handle icon information correctly.
Using built-in icons:
It is possible to use built-in icons for commands. See available built-in icon IDs from the BuiltInIcon enumeration in the IIconInformation interface.
    // Create iconInformation object for builtin Checkout icon.
    const iconIdInformation = {
        content: 0,
        iconContentType: "BUILT_IN",
        alt: `built-in icon alt`,
        extension: ""
    };
