PopUp Dashboard
Overview
This sample creates a basic User Interface Extensibility Framework application consisting of one ShellUI module which adds one button to main menu and it will opens one dashboard to the popup.
This sample does not show how to create a local development folder or to deploy the code to the M-Files server. It is assumed that a local development folder already exists, and that is the location in which the development is occurring.
Creating the application structure
Creating the application definition file
Into this folder we will create an application definition file. This file must be named appdef.xml. The application will use version 5 of the client schema (as we are only targeting newer M-Files versions). The application will declare a single Shell UI module (with its code in main.js), and no dashboards.
- XML
<?xml version="1.0"?>
<application xmlns:xsi="http://www.w3.org/2001/XMLSchema-instance" xsi:noNamespaceSchemaLocation="http://www.m-files.com/schemas/appdef-client-v5.xsd">
    <guid>83A5DD0A-E386-454E-B5AB-3D52AF13B7C3</guid>
    <name>PopUp Dashboard</name>
    <version>0.1</version>
    <description>A basic application showing how to work with dashboards.</description>
    <publisher>M-Files Corporation</publisher>
    <enabled-by-default>true</enabled-by-default>
    <modules>
        <module environment="shellui">
            <file>main.js</file>
        </module>
    </modules>
    <dashboards>
        <dashboard id="MySample">
            <content>index.html</content>
        </dashboard>
    </dashboards>
</application>
Creating the module
Next we will create a module file to contain our actual application logic. At this point we will just register to be notified of main lifecycle events:
- We will declare a default entry point for the ShellUI module.
- We will react to the NewShellFrame event and obtain a reference to the shell frame.
- We will react to the shell frame’s Started event (as using the shell frame before this point will result in an exception).
- JavaScript
// NOTE! This code is for demonstration purposes only and does not contain any kind of
//       error handling. MUST be revised before using in production.

function OnNewShellUI(shellUI) {
  /// <summary>Executed by the UIX when a ShellUI module is started.</summary>
  /// <param name="shellUI" type="MFiles.ShellUI">The shell UI object which was created.</param>

  // This is the start point of a ShellUI module.

  // Register to be notified when a new shell frame (MFiles.Event.NewShellFrame) is created.
  shellUI.Events.Register(MFiles.Event.NewShellFrame, handleNewShellFrame)
}

function handleNewShellFrame(shellFrame) {
  /// <summary>Handles the OnNewNormalShellFrame event for an IShellUI.</summary>
  /// <param name="shellFrame" type="MFiles.ShellFrame">The shell frame object which was created.</param>

  // The shell frame was created but it cannot be used yet.
  // The following line would throw an exception ("The object cannot be accessed, because it is not ready."):
  // shellFrame.ShowMessage("A shell frame was created");

  // Register to be notified when the shell frame is started.
  shellFrame.Events.Register(
    MFiles.Event.Started,
    getShellFrameStartedHandler(shellFrame),
  )
}

function getShellFrameStartedHandler(shellFrame) {
  /// <summary>Returns a function which handles the OnStarted event for an IShellFrame.</summary>

  // The shell frame is now started and can be used.

  return async () => {}
}
Creating a button in the main menu
Adding a button into the main menu involves two steps:
- Creating a new ICommand using CreateCustomCommand.
- Adding the command into the main menu using AddCustomCommandToMenu.
- JavaScript
// NOTE! This code is for demonstration purposes only and does not contain any kind of
//       error handling. MUST be revised before using in production.

function OnNewShellUI(shellUI) {
  /// <summary>Executed by the UIX when a ShellUI module is started.</summary>
  /// <param name="shellUI" type="MFiles.ShellUI">The shell UI object which was created.</param>

  // This is the start point of a ShellUI module.

  // Register to be notified when a new shell frame (MFiles.Event.NewShellFrame) is created.
  shellUI.Events.Register(MFiles.Event.NewShellFrame, handleNewShellFrame)
}

function handleNewShellFrame(shellFrame) {
  /// <summary>Handles the OnNewNormalShellFrame event for an IShellUI.</summary>
  /// <param name="shellFrame" type="MFiles.ShellFrame">The shell frame object which was created.</param>

  // The shell frame was created but it cannot be used yet.
  // The following line would throw an exception ("The object cannot be accessed, because it is not ready."):
  // shellFrame.ShowMessage("A shell frame was created");

  // Register to be notified when the shell frame is started.
  shellFrame.Events.Register(
    MFiles.Event.Started,
    getShellFrameStartedHandler(shellFrame),
  )
}

function getShellFrameStartedHandler(shellFrame) {
  /// <summary>Returns a function which handles the OnStarted event for an IShellFrame.</summary>

  // The shell frame is now started and can be used.

  return async () => {
    // Create a command (button).  Note that it is not yet visible.
    const showViewHistoryCmd =
      await shellFrame.Commands.CreateCustomCommand('Show view history')

    // Add the first command to the main menu.
    await shellFrame.Commands.AddCustomCommandToMenu(
      showViewHistoryCmd,
      MFiles.MenuLocation.MenuLocation_TopPaneMenu,
      1,
    )

    // Set command visility.
    await shellFrame.Commands.SetCommandState(
      showViewHistoryCmd,
      MFiles.CommandLocation.MainMenu,
      MFiles.CommandState.CommandState_Active,
    )
  }
}
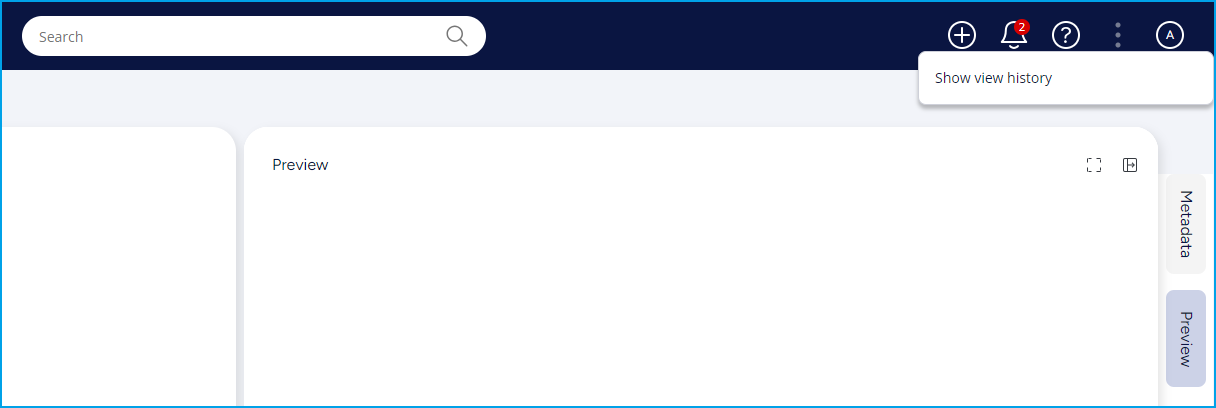
Logging into the M-Files vault should now show a button in the main menu (three dot menu near user icon) with the text Show view history:

Creating the dashboard
Next we will create a dashboard file that will be shown in the popup. It involves two steps:
- Create a index.html file which will load styles and dashboard handler
- Create a dashboard.js file which will handle the dashboard.
- HTML
<!doctype html>
<html lang="en">
  <head>
    <title>Sample</title>
    <script src="mfiles.extensibility.protocol.js"></script>

    <!-- Load styles and dashboard handler js file -->
    <link href="style.css" rel="stylesheet" />
    <script src="dashboard.js"></script>
  </head>
  <body>
    <div id="content"></div>
  </body>
</html>
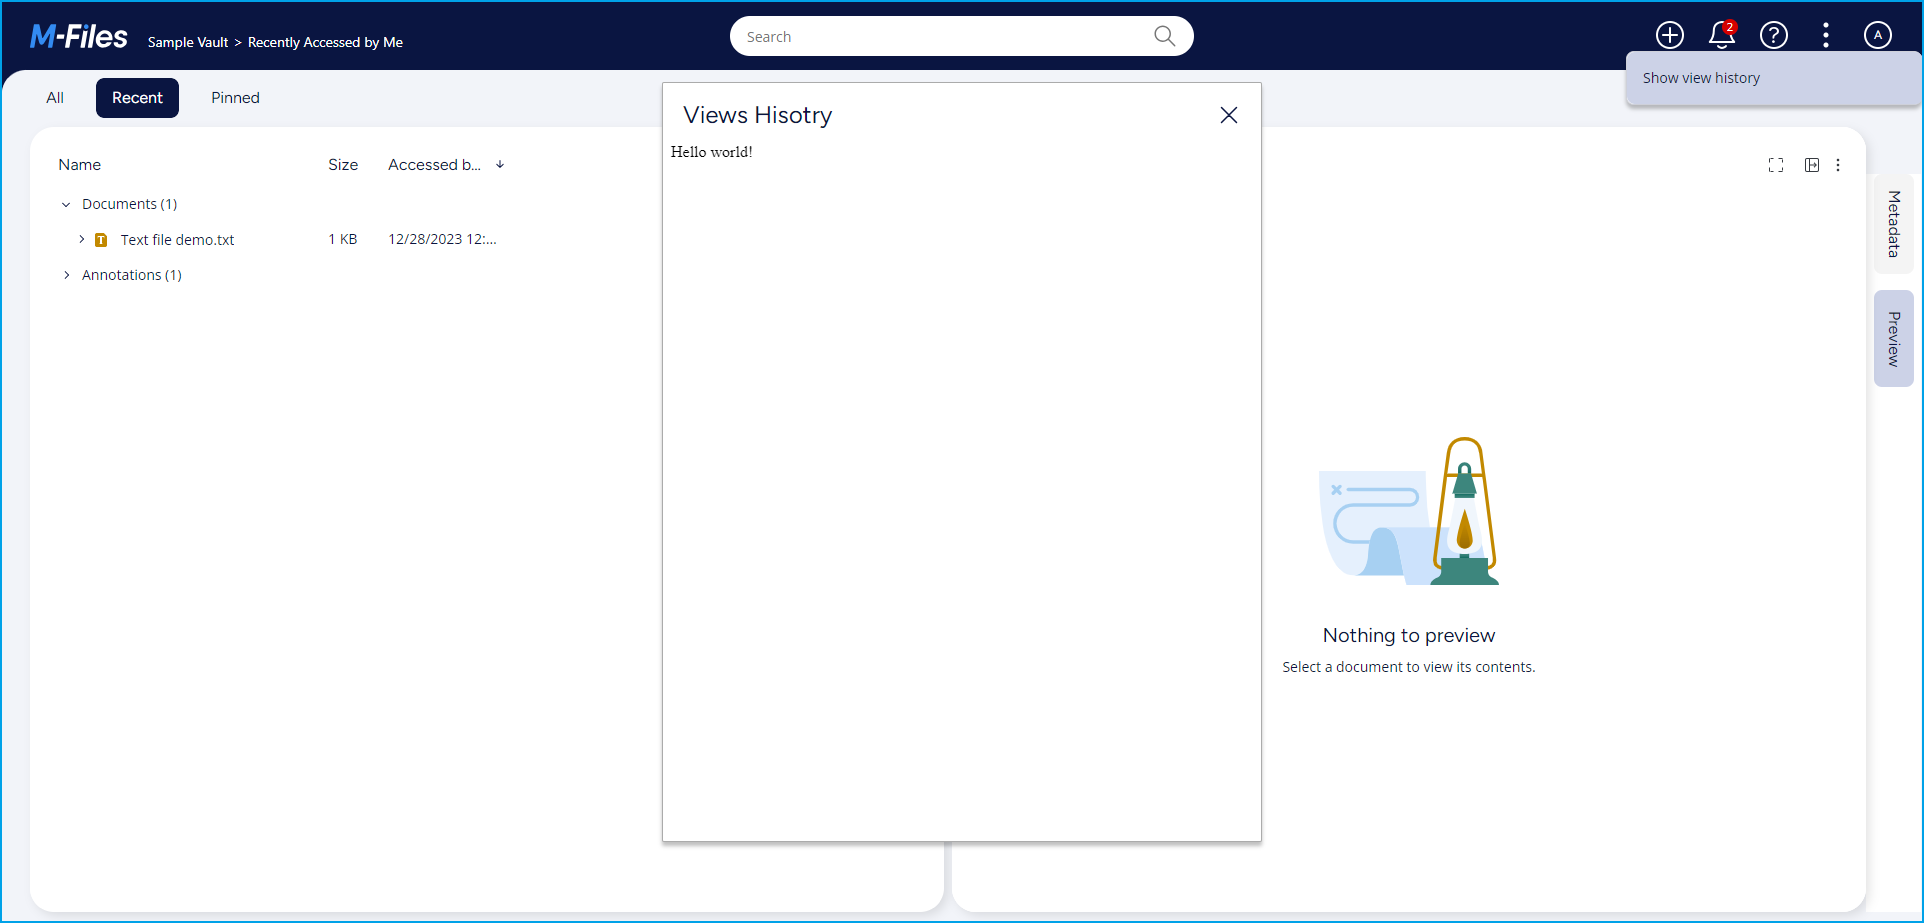
Create dashboard handler file using OnNewDashboard event. Once the dashboard started, the html content will be loaded and the content will be updated.
- JavaScript
function OnNewDashboard(dashboard) {
  /// <summary>Executed by the UIX when a dashboared is started.</summary>
  /// <param name="dashboard" type="MFiles.Dashboard">The dashboard object which was created.</param>

  // Register a handler to listen the started event.
  dashboard.Events.Register(MFiles.Event.Started, () => {
    // Get the element from the UI.
    const contentElement = document.getElementById('content')

    // Prepare the html content that to be updated.
    const htmlContent = '<div> Hello world!</div>'

    // Update the content.
    contentElement.innerHTML = htmlContent
  })
}
Show the dashboard on clicking button
Showing dashboard while clicking a command clicked involves three steps:
- Register to be notified of the CustomCommand event.
- Ensure that the command that was clicked was the one we want to handle.
- Call ShowPopupDashboard from shellframe instance.
We will have three parameters for this ShowPopupDashboard
- Id of the dashboard which is mentioned in the appdef.xml. Ex. MySample
- customData - Data needs to be passed to dashboard.
- title - The title for the dashboard.
- JavaScript
// NOTE! This code is for demonstration purposes only and does not contain any kind of
//       error handling. MUST be revised before using in production.

function OnNewShellUI(shellUI) {
  /// <summary>Executed by the UIX when a ShellUI module is started.</summary>
  /// <param name="shellUI" type="MFiles.ShellUI">The shell UI object which was created.</param>

  // This is the start point of a ShellUI module.

  // Register to be notified when a new shell frame (MFiles.Event.NewShellFrame) is created.
  shellUI.Events.Register(MFiles.Event.NewShellFrame, handleNewShellFrame)
}

function handleNewShellFrame(shellFrame) {
  /// <summary>Handles the OnNewNormalShellFrame event for an IShellUI.</summary>
  /// <param name="shellFrame" type="MFiles.ShellFrame">The shell frame object which was created.</param>

  // The shell frame was created but it cannot be used yet.
  // The following line would throw an exception ("The object cannot be accessed, because it is not ready."):
  // shellFrame.ShowMessage("A shell frame was created");

  // Register to be notified when the shell frame is started.
  shellFrame.Events.Register(
    MFiles.Event.Started,
    getShellFrameStartedHandler(shellFrame),
  )
}

function getShellFrameStartedHandler(shellFrame) {
  /// <summary>Returns a function which handles the OnStarted event for an IShellFrame.</summary>

  // The shell frame is now started and can be used.

  return async () => {
    // Create a command (button).  Note that it is not yet visible.
    const showViewHistoryCmd =
      await shellFrame.Commands.CreateCustomCommand('Show view history')

    // Add the first command to the main menu.
    await shellFrame.Commands.AddCustomCommandToMenu(
      showViewHistoryCmd,
      MFiles.MenuLocation.MenuLocation_TopPaneMenu,
      1,
    )

    // Set command visility.
    await shellFrame.Commands.SetCommandState(
      showViewHistoryCmd,
      MFiles.CommandLocation.MainMenu,
      MFiles.CommandState.CommandState_Active,
    )

    // Register to be notified when a custom command is clicked.
    // Note: this will fire for ALL custom commands, so we need to filter out others.
    shellFrame.Commands.Events.Register(
      MFiles.Event.CustomCommand,
      async (command) => {
        // Execute only our custom command.
        if (command === showViewHistoryCmd) {
          // Show popup dashboard with custom data.
          await shellFrame.ShowPopupDashboard('MySample', {}, 'Views Hisotry')
        }
      },
    )
  }
}

Passing custom data to the dashboard
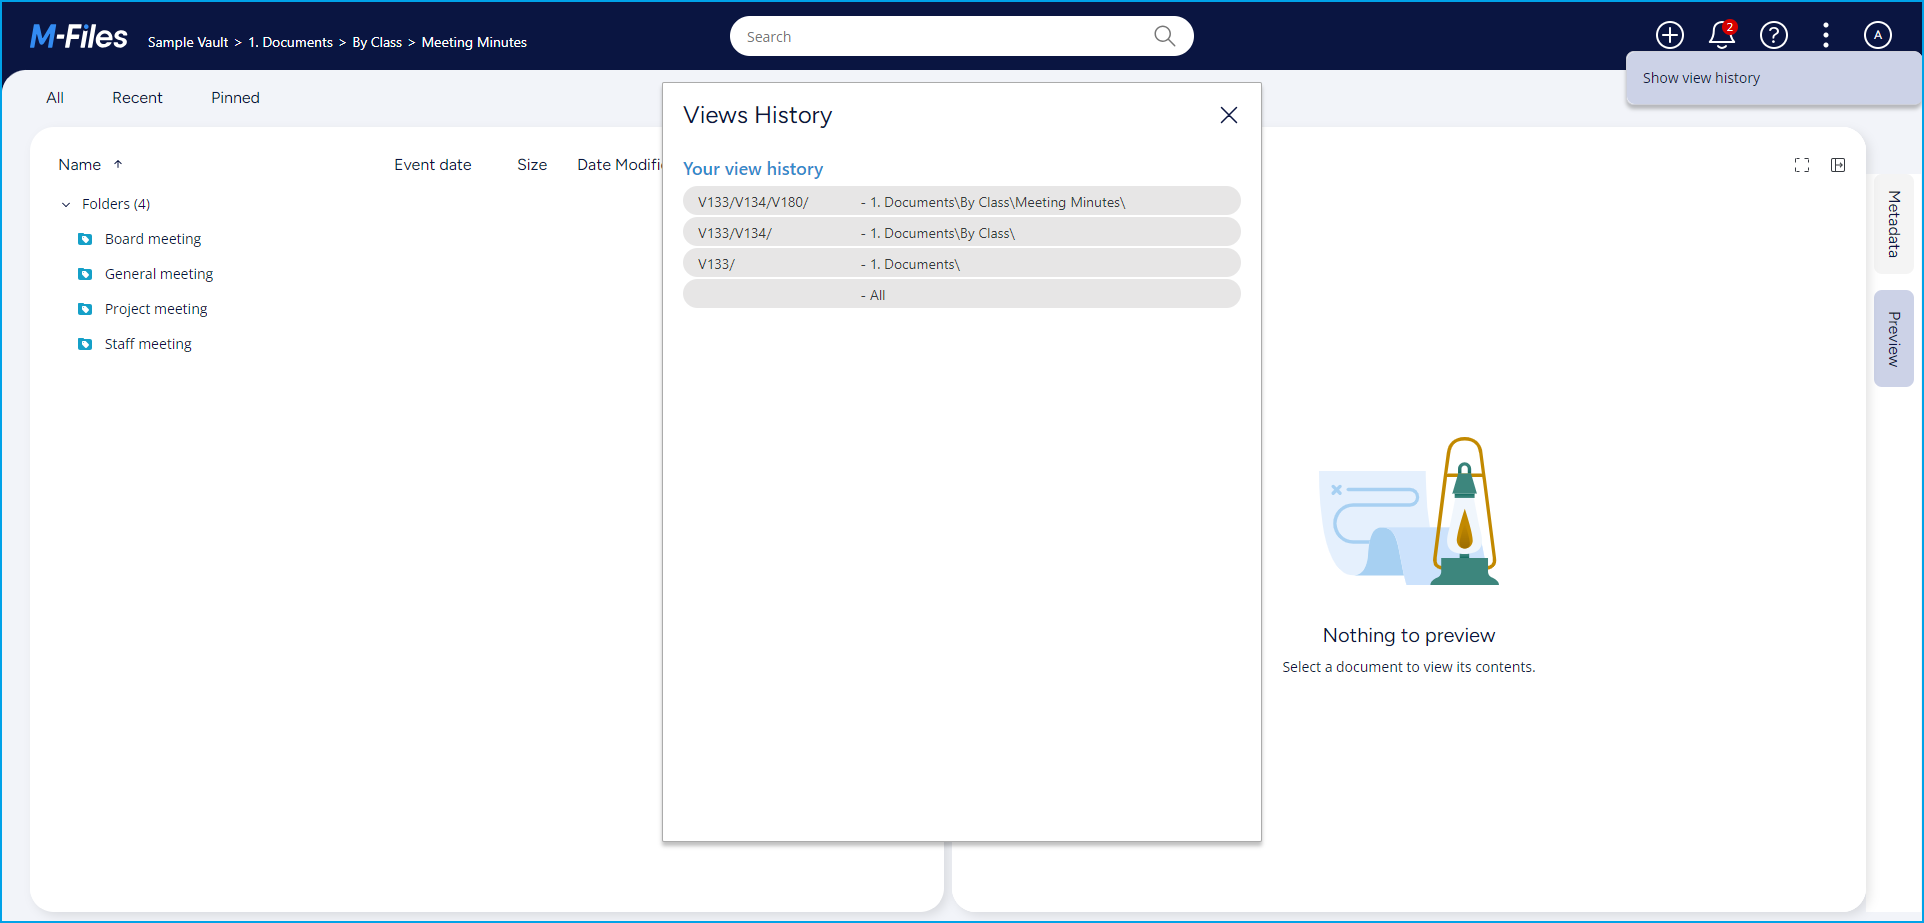
On each view location change, the current path is stored in an array which will be passed to the dashboard while clicking the button in the main menu. We must be able to react to view location change.
We will:
- React to the ViewLocationChange event.
- Store both view id and view path information to the array.
- Store the history in the web storage
- Pass the viewsHistory value to the dashboard as
customData.
- JavaScript
// NOTE! This code is for demonstration purposes only and does not contain any kind of
//       error handling. MUST be revised before using in production.

function OnNewShellUI(shellUI) {
  /// <summary>Executed by the UIX when a ShellUI module is started.</summary>
  /// <param name="shellUI" type="MFiles.ShellUI">The shell UI object which was created.</param>

  // This is the start point of a ShellUI module.

  // Register to be notified when a new shell frame (MFiles.Event.NewShellFrame) is created.
  shellUI.Events.Register(MFiles.Event.NewShellFrame, handleNewShellFrame)
}

function handleNewShellFrame(shellFrame) {
  /// <summary>Handles the OnNewNormalShellFrame event for an IShellUI.</summary>
  /// <param name="shellFrame" type="MFiles.ShellFrame">The shell frame object which was created.</param>

  // The shell frame was created but it cannot be used yet.
  // The following line would throw an exception ("The object cannot be accessed, because it is not ready."):
  // shellFrame.ShowMessage("A shell frame was created");

  // Register to be notified when the shell frame is started.
  shellFrame.Events.Register(
    MFiles.Event.Started,
    getShellFrameStartedHandler(shellFrame),
  )

  // Register to be notified when the view location changed.
  shellFrame.Events.Register(
    MFiles.Event.ViewLocationChanged,
    getViewLocationChangedHandler(shellFrame),
  )
}

function getShellFrameStartedHandler(shellFrame) {
  /// <summary>Returns a function which handles the OnStarted event for an IShellFrame.</summary>

  // The shell frame is now started and can be used.

  return async () => {
    // Create a command (button).  Note that it is not yet visible.
    const showViewHistoryCmd =
      await shellFrame.Commands.CreateCustomCommand('Show view history')

    // Add the first command to the main menu.
    await shellFrame.Commands.AddCustomCommandToMenu(
      showViewHistoryCmd,
      MFiles.MenuLocation.MenuLocation_TopPaneMenu,
      1,
    )

    // Set command visility.
    await shellFrame.Commands.SetCommandState(
      showViewHistoryCmd,
      MFiles.CommandLocation.MainMenu,
      MFiles.CommandState.CommandState_Active,
    )

    // Register to be notified when a custom command is clicked.
    // Note: this will fire for ALL custom commands, so we need to filter out others.
    shellFrame.Commands.Events.Register(
      MFiles.Event.CustomCommand,
      async (command) => {
        // Execute only our custom command.
        if (command === showViewHistoryCmd) {
          // Get view history from the storage.
          const viewHistoryString =
            await MFiles.ReadFromWebStorage('viewsHistory')
          let viewsHistory = []
          if (viewHistoryString) {
            viewsHistory = JSON.parse(viewHistoryString)
          }

          // Show popup dashboard with custom data.
          await shellFrame.ShowPopupDashboard(
            'MySample',
            {
              viewsHistory: viewsHistory,
            },
            'Views History',
          )
        }
      },
    )
  }
}

function getViewLocationChangedHandler(shellFrame) {
  /// <summary>Returns a function which handles the OnViewLocationChange event.</summary>

  return async () => {
    // Get the view history from storage.
    const viewHistoryString = await MFiles.ReadFromWebStorage('viewsHistory')
    let viewHistory = []

    // Parse the view history from the string.
    if (viewHistoryString) {
      viewHistory = JSON.parse(viewHistoryString)
    }

    // Prepare the current view object.
    viewHistory.push({
      time: Date.now(),
      viewUrl: shellFrame.CurrentUrl,
      viewPath: shellFrame.CurrentPath || 'All',
    })

    // Write viewhistory to web storage.
    await MFiles.WriteToWebStorage('viewsHistory', JSON.stringify(viewHistory))
  }
}
Handling custom data in the dashboard handler
Custom data will be available in the dashboard instance.
- JavaScript
function OnNewDashboard(dashboard) {
  /// <summary>Executed by the UIX when a dashboared is started.</summary>
  /// <param name="dashboard" type="MFiles.Dashboard">The dashboard object which was created.</param>

  // Get the viewshistory and sort items in descending order.
  let viewsHistory = dashboard.CustomData.viewsHistory || []
  viewsHistory = viewsHistory.sort((a, b) => b.time - a.time)

  // Register a handler to listen the started event.
  dashboard.Events.Register(MFiles.Event.Started, () => {
    // Get the element from the UI.
    const contentElement = document.getElementById('content')

    // Prepare the html content that to be updated.
    const htmlContent = `
                <div class="label">Your view history</div>
                ${viewsHistory
                  .map((value) => {
                    return `<div class="history-item">
                            <div class="viewid">${value.viewUrl} </div>
                            <div class="viewpath">- ${value.viewPath} </div>
                        </div>`
                  })
                  .join('')}
            `

    // Update the content.
    contentElement.innerHTML = htmlContent
  })
}
- CSS
html,
body {
  font-family: Lato, 'Segoe UI', Sans-Serif;
  margin: 0;
  background: #fff;
  height: 100%;
  color: #363a40;
  font-size: 14px;
  padding: 0 10px;
}

div {
  padding: 4px 0;
}

span {
  font-size: 18px;
  font-weight: 500;
}

.label {
  font-size: 18px;
  font-weight: 500;
  color: #318ccc;
  margin-top: 13px;
}

.history-item {
  width: calc(100% - 30px);
  height: 25px;
  margin: 2px 0;
  padding: 2px 15px;
  background: #e7e6e6;
  border-radius: 15px;
}

.viewid {
  display: inline-block;
  width: 30%;
}

.viewpath {
  display: inline-block;
  width: 69%;
}
Testing the application
Open M-Files web and navigate to the different views. Now click Show view history buttin from the main menu.
