Hello, world
This sample creates a basic User Interface Extensibility Framework application consisting of one ShellUI module which shows a dialog box to the user when the shell frame (section 2.6) is available. The shell frame is a useful object as it allows us to interact with the shell listings and commands (such as buttons) within the user interface.
The source code for this sample is available within our GitHub Samples and Libraries repository.
Creating a local development folder
Firstly, let’s create a local development folder for the application. For this sample we will assume that the M-Files vault GUID is {C840BE1A-5B47-4AC0-8EF7-835C166C8E24} and the M-Files client version is 11.3.4330.196:

Creating the application definition file
Into this folder we will create an application definition file. This file must be named appdef.xml. The application will use version 3 of the client schema (as we are only targeting newer M-Files versions), and the supported platform will be set as desktop only. The application will declare a single Shell UI module (with its code in main.js), and no dashboards.
<?xml version="1.0" encoding="UTF-8"?>
<application xmlns:xsi="http://www.w3.org/2001/XMLSchema-instance"
		xsi:noNamespaceSchemaLocation="http://www.m-files.com/schemas/appdef-client-v3.xsd">
	<guid>711441b6-dca0-4c9c-a04e-37bd4717e7fe</guid>
	<name>Hello, world</name>
	<version>0.1</version>
	<description>A basic application showing how to react to the shell frame being available.</description>
	<publisher>M-Files Corporation</publisher>
	<copyright>(c) M-Files Corporation 2017</copyright>
	<required-mfiles-version>11.3.0000.00</required-mfiles-version>
	<platforms>
		<platform>Desktop</platform>
	</platforms>
	<modules>
		<module environment="shellui">
			<file>main.js</file>
		</module>
	</modules>
</application>
Ensure that your application has a unique GUID by using a GUID generator, such as this one.
Creating the module
Next we will create a module file to contain our actual application logic. The logic will be simple:
- We will declare a default entry point for the ShellUI module.
- We will react to the
NewShellFrameevent and obtain a reference to the shell frame. - We will react to the shell frame’s
Startedevent (as using the shell frame before this point will result in an exception). - We will display a message to the user that the shell frame is ready for use.
// NOTE! This code is for demonstration purposes only and does not contain any kind of
// 		 error handling. MUST be revised before using in production.

"use strict";

function OnNewShellUI( shellUI )
{
	/// <summary>Executed by the UIX when a ShellUI module is started.</summary>
	/// <param name="shellUI" type="MFiles.ShellUI">The shell UI object which was created.</param>

	// This is the start point of a ShellUI module.

	// Register to be notified when a new normal shell frame (Event_NewNormalShellFrame) is created.
	// We use Event_NewNormalShellFrame rather than Event_NewShellFrame as this won't fire for history (etc.) dialogs.
	// ref: https://www.m-files.com/UI_Extensibility_Framework/index.html#Event_NewNormalShellFrame.html
	shellUI.Events.Register(
		Event_NewNormalShellFrame,
		handleNewShellFrame );
}

function handleNewShellFrame(shellFrame)
{
	/// <summary>Handles the OnNewNormalShellFrame event for an IShellUI.</summary>
	/// <param name="shellFrame" type="MFiles.ShellFrame">The shell frame object which was created.</param>

	// The shell frame was created but it cannot be used yet.
	// The following line would throw an exception ("The object cannot be accessed, because it is not ready."):
	// shellFrame.ShowMessage("A shell frame was created");

	// Register to be notified when the shell frame is started.
	// This time pass a reference to the function to call when the event is fired.
	shellFrame.Events.Register(
		Event_Started,
		getShellFrameStartedHandler( shellFrame) );
}

function getShellFrameStartedHandler(shellFrame)
{
	/// <summary>Returns a function which handles the OnStarted event for an IShellFrame.</summary>

	return function() {
		// The shell frame is now started and can be used.
		// Note: we need to use the global-scope variable.
		shellFrame.ShowMessage( "A shell frame is available for use." );
	}
}
Testing the application
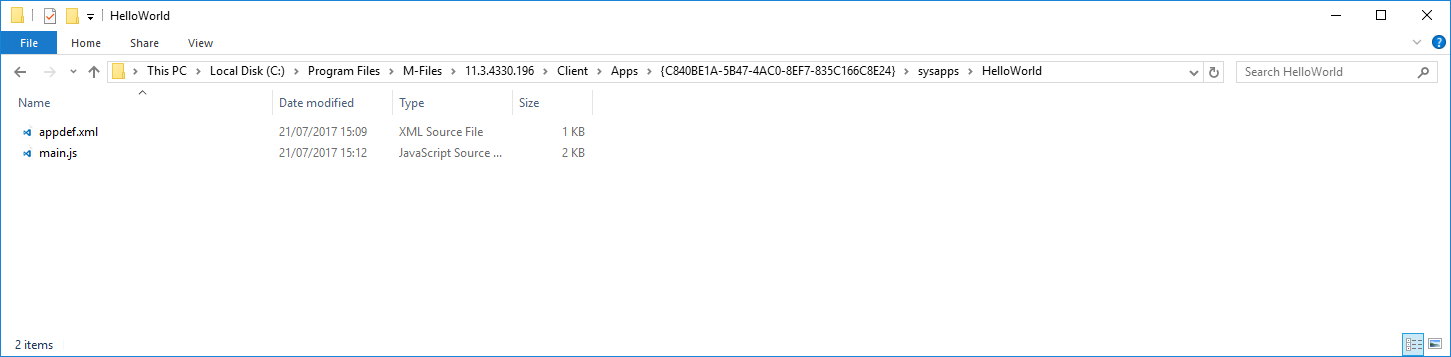
To test the application, ensure that all the files are saved. The local development folder should look like this:
Open M-Files and navigate to the vault. The following message should be shown on-screen:
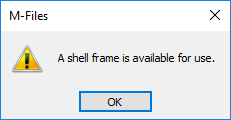
If the message is not shown, ensure you log out from the vault and log in again to see the changes.
Deploying the application
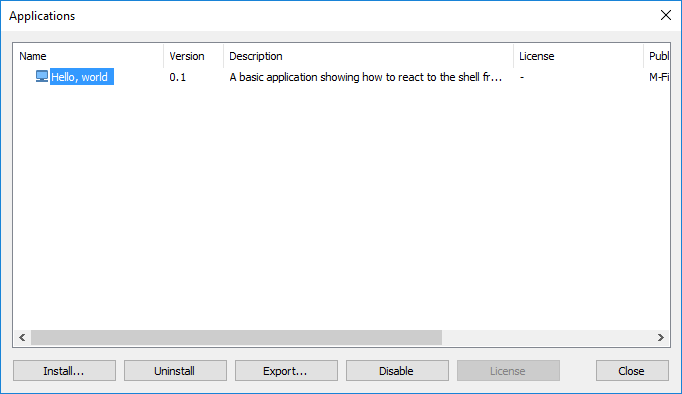
To deploy the application:
- Zip the contents of the local development folder (e.g.
HelloWorld.zip). - Open the M-Files Admin tool and connect to your M-Files server.
- Right-click on the vault to install the application to.
- Select
Applications. - Click
Install...and select the zip file. - Click
Openand the application should be listed.
The zipped file can be renamed to have a .mfappx extension if you wish to differentiate it from other zip files.
If you are testing the deployed application from your local machine then ensure that the local development folder is removed prior to deployment, otherwise it will override the deployed code.